visual communication
Typographic Systems
:::::::::::::::::::::::::::::::::::::::::::
:- I love Typography
:- Typotheque
:- Ministry of Type
:- Type Theory
:- Typographcia
:- Typography Served
:- Typeworkshop.com
:- Typophile
.......................................................
Videos
:- Typography is...
:- Font Conference
:- Trajan is the movie font
:- Type Culture Movies
:- Type with feeling
Inspired
:- Gordan Young
:- Periodic Table of Type
:- 21 unexpected alphabets
Type Classifications
:- Type Culture
:- Type classifications by Hoefler
:- Evolution of Type
:- Typography Heros
Vernacular Type
:- circus and swoosh
:- retro and vintage
:- type in brooklyn {aiga article
:- center for vernacular type
:- douglas wilson
Handmade, Buy, Make
:- dropcap daily
:- handmade fonts
:- hand drawn font {aiga article
:- design it your self font design
:- 26 types of animals
::::
:::::::::::::::::::::::::::::::::::::::::::::::::::::::::::::::::::::::::::::::::::::::::::::::::::::::::::::::::::::
TYPE WORKBOOK
The type workbook is a series of investigations you will be conducting. The content ranges from typographic studies to type setting rules in typography. It is a time intensive project that requires a lot of attention to details. The workbook should hold together as one document. There are different types of information you will be "displaying" As design professionals it will be apparent if you know the rules or if you dont. When a professional looks at your type, they can immediately tell if you "know" type. Getting and keeping the job you want requires that you know and master these rules/terms. The upper-level classes focus on the macro of typography, the big idea... this workbook focuses on the micro (all the typographic details) it is expected that you know this information and it will not be covered again.
..................................................................................................................................................
Intense Attention to Detail
To design professionals it will be apparent if you know type or if you dont. When a good professional looks at your type, they can immediately tell. Getting and keeping the job you want, whether in traditional or digital design, requires that you know and master typographic rules, terms and application. Upper-level classes focus on the macro of typography, the big idea... this workbook focuses on the micro (all the typographic details). It is expected that you learn this information as it will not be covered again.
You are creating your own typographic resource that you can reference again and again. Take care, invest the time needed, and pay attention to every detail.
..................................................................................................................................................
Rules, Hierarchy and Pacing
The project is all about the rules and details of typography, using them to design your book and presenting them within the book content. Another important component is pacing: applying hierarchy through scale, contrast, position and arrangement to invite the reader into the page.
The investigations themselves are basic but how you apply all you learn through them will give you the tools to attain a sophisticated command of arranging complex information in elegant and understandable ways. You will use the learnings to highlight important content and treat title and chapter pages, running headers, captions and folios. Your use of typeface, type size and weight and your use of color is what will make the book beautiful, elegant and dynamic (or not). This is not an easy project, it is complex.
Link to DropBox make sure you can get onto it
..................................................................................................................................................
Resources
On-line
Jonathan Hoeflers Type Styles 101 (typophile.com)
Type Classification by Ellen Lupton (Thinking With Type)
The Elements of Typographic Style: Robert Bringhurst
Matthew Butterick's Practical Typography
Lynda.com
Books
The Elements of Typographic Style: Robert Bringhurst
Getting it Right with Type: Victoria Squire
Typographic Systems: Kimberly Elam
Read
Read the InDesign How to Document (pdf)
..................................................................................................................................................
Rules & Restrictions
goals:
successfully design and typeset both a printed book about the principles of typography
tools: Adobe InDesign
size print: 8.25 x 10.75
page count: unlimited so do not overcrowd pages
fonts: typefaces of your choice,
determined by investigation
color: full color
grid: 6 column
output: final output will be digitally printed with Lulu.com
START THINKING ABOUT THE NEXT PROJECT:
you will be designing a book jacket for a Banned Book Classic or a book by Ernest Hemmingway. You must have read the book to design a cover for it so please start figuring out what 1 - 3 books sound interesting to you. You only need one but think about more than one so you make an informed choice. Google your choices if there already a great book jacket you may want to choose another one... Lots have been done for 1984.
1. The Great Gatsby, by F. Scott Fitzgerald
2. The Catcher in the Rye, by J.D. Salinger
3. The Grapes of Wrath, by John Steinbeck
4. To Kill a Mockingbird, by Harper Lee
5. The Color Purple, by Alice Walker
6. Ulysses, by James Joyce
7. Beloved, by Toni Morrison
8. The Lord of the Flies, by William Golding
9. 1984, by George Orwell
11. Lolita, by Vladmir Nabokov
12. Of Mice and Men, by John Steinbeck
15. Catch-22, by Joseph Heller
16. Brave New World, by Aldous Huxley
17. Animal Farm, by George Orwell
18. The Sun Also Rises, by Ernest Hemingway
19. As I Lay Dying, by William Faulkner
20. A Farewell to Arms, by Ernest Hemingway
23. Their Eyes Were Watching God, by Zora Neale Hurston
24. Invisible Man, by Ralph Ellison
25. Song of Solomon, by Toni Morrison
26. Gone with the Wind, by Margaret Mitchell
27. Native Son, by Richard Wright
28. One Flew Over the Cuckoo's Nest, by Ken Kesey
29. Slaughterhouse-Five, by Kurt Vonnegut
30. For Whom the Bell Tolls, by Ernest Hemingway
33. The Call of the Wild, by Jack London
36. Go Tell it on the Mountain, by James Baldwin
38. All the King's Men, by Robert Penn Warren
40. The Lord of the Rings, by J.R.R. Tolkien
45. The Jungle, by Upton Sinclair
48. Lady Chatterley's Lover, by D.H. Lawrence
49. A Clockwork Orange, by Anthony Burgess
50. The Awakening, by Kate Chopin
53. In Cold Blood, by Truman Capote
55. The Satanic Verses, by Salman Rushdie
57. Sophie's Choice, by William Styron
64. Sons and Lovers, by D.H. Lawrence
66. Cat's Cradle, by Kurt Vonnegut
67. A Separate Peace, by John Knowles
73. Naked Lunch, by William S. Burroughs
74. Brideshead Revisited, by Evelyn Waugh
75. Women in Love, by D.H. Lawrence
80. The Naked and the Dead, by Norman Mailer
84. Tropic of Cancer, by Henry Miller
88. An American Tragedy, by Theodore Dreiser
97. Rabbit, Run, by John Updike
..................................................................................................................................................
C A L E N D A R
..................................................................................................................................................
THURSDAY, MARCH 12
Into to Workbook Project
Working in class on headers and notes
HOMEWORK
1. Check out the Resources listed above
2. Complete Journal: TM Research Archive
3. Sketch/concept (on or off the computer) at least 20 ways to show your chapter openings/look and feel.
_ How you will treat chapter headers: typographically, diagrams, photography.
_ How does your workbook function, what does it look like?
_ Exploring Chapter headers and overall look and feel.
4. On the computer create 6 different design directions / concepts. Use the chapters Special Characters and Rules Check Sheet to test your design directions. Make sure you have at least 3 levels of hierarchy.
5. Consider page layout, heirarchy, page numbers, captions...
Use as many pages as you think you need.
Tip: do not try and fit all the text on 1 spread.
Print everything out full size. Black and White is fine. Trim.
..................................................................................................................................................
TUESDAY, MARCH 24
Working in class
HOMEWORK
Most of you need to keep exploring the concept of the book. The big picture look and feel plus add more content. Based on feedback refine chapter headers/look and feel, refine typography, create stylesheets.
Layout 4 additional chapters. Save as a pdf and be prepared to work for one on one crits.
..................................................................................................................................................
THURSDAY, MARCH 26
Working in class
HOMEWORK
Make sure you are using Style Sheets for your Body Text, Headers, Subheads, Callouts. Watch a Lynda.com tutorial if you can't remember how to make them or check out
InDesign How to Document (pdf)
Define and refine the concept and big picture of the look and reel of your book. It is best for your sanity if you get 5 more chapters done and all the title pages figured out this weekend.
Journal Entry: Thinking Form
..................................................................................................................................................
TUESDAY, MARCH 31
Working in class. Add at least 2 more chapters to your workbook.
HOMEWORK
Finish at least 2 more chapters for the printed book. Save as a pdf.
.................................................................................................................................................. THURSDAY, APRIL 2
Meet in 315 for a French Paper Presentation then we will move to 307.
What Bookcover are you going to redesign?
InClass lecture on
_ Find Change
_ Tabulation of Numbers
_ Adding Page Numbers
_ Combining Typefaces
HOMEWORK
Refine and finish workbook. Print a draft of your book with Jayhawk Ink. B/W is fine.
Journal: Chip Kidd
..................................................................................................................................................
DUE: TUESDAY, APRIL 7
Full class crit of print books. Please have a B/W printed copy (from Jayhawk Ink) of your printed book. Hand in printed books and pdf. We will go over how to order from LULU.com next wee
..................................................................................................................................................
C O N T E N T
..................................................................................................................................................
TITLE PAGE*
name of your book
your name
University of Kansas, 2015
* come up with a title (and subtitle) for your book: type rules, typographic dogma, details...
..................................................................................................................................................
Add to the beginning or end of the book.
Designed by Your Name. Class project for Typographic Systems at the University of Kansas, Spring 2015. The text was compiled from the following sources: Elements of Typographic Style by Robert Bringhurst, Getting it Right with Type: the Do's and Don'ts of Typography by Victoria Square, Mac is Not A Typewriter by Robin Williams. This book is not to be sold to the public and to only be used by the designer for their reference and student design portfolio.
..................................................................................................................................................
TABLE OF CONTENTS
Special Characters
Rules Check Sheet
Typographic Rules
Typographic Color (X-Height)
Grid Structure
Quotes,
Apostrophes
Dashes
Small Caps
Numerals/Figures
Paragraph Rules
Heads And Subheads
Captions And Notes
Column Width Leading
Kerning
Alignments
Justification
Word Spacing
Hyphenation Rules
Combining Typefaces
Font Specs (optional)
..................................................................................................................................................
SPECIAL CHARACTERS
The following is a list of the most often-used special characters and accent marks.
(*you will need to recreate this an x is in place of the "real" character, ALSO use tabs to tab text over to align)
x Option [ opening double quote
x Option Shift [ closing double quote
x Option ] opening single quote
x Option Shift ] closing single quote; apostrophe
x Option Hyphen en dash
x Option Shift Hyphen em dash x Option ; ellipsis
x Option 8 bullet (easy way to remember as it's the asterisk key)
x Option Shift 5 ligature of f and i
x Option Shift 6 ligature of f and l
x Option g copyright
x Option 2 trademark
x Option r registered
x Option Shift 8 degree symbol (e.g., 102°F)
x Option $ cent symbol
x Option Shift 2 Euro symbol
x Option Shift 1 (one) fraction bar
x Option 1 (one)
x Option Shift ?
x Option 3
x Option c
x Option Shift c
Use copyright, register, and trademark marks properly
The copyright, register, and trademark characters need to be reduced to work with body text. At times, depending on the typeface, you may need to reduce the mark between 50% and 70%. The goal is to match the x-height. The copyright mark should be approximately 70% of the surrounding text. Unlike the symbol, the © should NOT be superscripted and should remain on the baseline. is usually superscripted for the chosen font. and ® are normally set higher then other marks. If you choose to superscript ®, reduce it to about 60% of the size.
Ellipsis Character
Use the ellipsis character and NOT three periods. You can access the ellipsis by typing Option + : (colon). Allow a small amount of space before and after. However if it is not crowding the text, leave no space at all.
Accent Marks
Remember, to set an accent mark over a letter, press the Option key and the letter, then press the letter you want under it.
´ Option e
` Option ~ (upper-left or next to the Spacebar)
¨ Option u
Option n
Option i
..................................................................................................................................................
RULES CHECKSHEET
The following is a compendium of the rules established in this book. You might want to check through them each time you complete a publication.
-- Use only one space between sentences.
-- Use real quotation marks.
-- Use real apostrophes.
-- Make sure the apostrophes are where they belong.
-- Hang the punctuation off the aligned edge.
-- Use en or em dashes, use consistently.
-- Kern all headlines where necessary.
-- Never use the spacebar to align text, always set tabs and use the tab key.
-- Leave no widows or orphans.
-- Avoid more than 3 hyphenations in a row.
-- Avoid too many hyphenations in any paragraph.
-- Avoid hyphenating or line brakes of names and proper nouns.
-- Leave a least 2 characters on the line and 3 following.
-- Avoid beginning consecutive lines with the same word.
-- Avoid ending consecutive lines with the same word.
-- Avoid ending lines with the words: the, of, at, a, by...
-- Never hyphenate a words in a headline and avoid hyphenation in a callout.
-- Never justify the text on a short line.
-- Keep the word spacing consistent.
-- Tighten up the leading in lines with all caps or with few ascenders and descenders.
-- Use a one-em first-line indent on all indented paragraphs.
-- Adjust the spacing between paragraphs.
-- Either indent the first line of paragraphs or add extra space between them not both.
-- Use a decimal or right-aligned tab for the numbers in numbered paragraphs.
-- Never have one line in a paragraph in the column or following.
-- Never combine two serif fonts on one page.
-- Rarely combine two sans serif fonts on one page.
-- Rarely combine more than three typefaces on one page.
-- Use the special characters whenever necessary, including super- and subscript.
-- Spend the time to create nice fraction or chose a font that has fractions.
-- If a correctly spelled word needs an accent mark, use it.
..................................................................................................................................................
TYPOGRAPHY RULES
1. Insert only a single space after all punctuation
Inserting two spaces after a period was common when using a typewriter. Monospace typefaces were designed to occupy the same amount of space no matter the width of the character. Therefore, two spaces were needed to identify the end of a sentence and the beginning of another sentence. With the introduction of the Mac and digital type, characters are designed proportionately, which allows for the correct practice of using one space after all punctuation.
2. Use proper em dashes, en dashes, and hyphens
An em is a unit of measure equal to the point size that you are using. An em dash is a type of punctuation used to offset clauses in a sentence or to indicate an abrupt change in thought. An en dash is equal to half the length of an em dash. En dashes are used to denote duration (time.)
3. Use proper quote and apostrophe marks
Use true quotation marks and apostrophes instead of using inch marks and feet marks. Place all punctuations inside the quotation marks.
4. Use True Small Caps
When setting text that contains acronyms, select a typeface with small caps as a family. Selecting small caps from the style menus is a poor choice because the compute reduces the overall size of the type by 80%. This changes the stroke weight and the feel of the font. Expert sets in the Adobe Type Library have small caps options.
5. Add letter spacing to capitalized text and small caps
Letterspacing is the amount of space between characters in a word. Some software programs caller letterspacing tracking. Use positive number values (to about 2 or 3) to open up letterspacing to capitalized text and small caps, except when periods are used between characters.
6. Use old style figures when appropriate
Old style figures, also known as non-lining figures do not line up on the baseline as regular or lining numerals do. They can be found in various fonts. If the body text has a significant amount of numbers, research a font family where they are included. If non-lining numerals are not available, use a slightly smaller point size for the lining numbers. Think of lining numbers as upper case numbers and non-lining numbers as lower case numbers.
7. Use caps properly
With options given to you by almost any type family (bold, point size, etc) you will seldom need to use all caps to draw attention to your text. Not all typefaces are legible when set in all caps; esp. true for script and decorative typefaces. Short headlines may be the once exception to this rule.
8. Use copyright, register, and trademark marks properly
The copyright, register, and trademark characters need to be reduced to work with body text. At times, depending on the typeface, you may need to reduce the mark between 50% and 70%. The goal is to match the x-height. The copyright mark should be approximately 70% of the surrounding text. Unlike the symbol, the © should NOT be superscripted and should remain on the baseline. is usually superscripted for the chosen font. and ® are normally set higher then other marks. If you choose to superscript ®, reduce it to about 60% of the size.
9. Ellipsis Character
Use the ellipsis character and NOT three periods. You can access the ellipsis by typing Option + : (colon). Allow a small amount of space before and after. However if it is not crowding the text, leave no space at all.
10. Avoid underlined text
This was useful back in the days of the typewriter to draw attention to the text. With digital type and their families, you should not need to use underlined text.
10. Increase line spacing to improve readability in body text
Line spacing (aka leading) refers to the space between lines of text. It is important for readability and appearance. Leading is measured from baseline to baseline. As a rule of thumb, allow leading that is 120% of the point size. For sans serif, you may need 130% or more. When setting headlines, solid leading (leading = point size, 12/12) or negative leading (leading =< point size, 12/10) may be appropriate.
11. Body copy size
Body text is set anywhere from 9-12 points. When you print text, it is usually larger than what it looked like on the screen. So, print out your text before finalizing your layout. Type studies will help you determine the proper size before you proceed with your layout.
12. Altering fonts
Dont alter the original typeface by stretching or condensing the letters improperly. Certain type families provide you with a lot of flexibility, so you should not need to destroy/alter text.
13. Legibility of fonts
Sans serif typefaces work well for headlines and to set text that is aligned to vertical/horizontal lines. Certain sans serif typefaces which are not very geometrical work well for body copy (i.e. Frutiger, Meta, Scala Sans, etc.)
14. Decrease line length and increase margins
Line length is a measure of text on one line. Any measure between 45 and 75 characters is comfortable for single column widths. The ideal measure for body text length is 66 characters (counting both letters, punctuation, and spaces.) For multiple columns, a measure between 40 and 50 characters is ideal.
15. Avoid letterspacing lowercase body copy
Dont letterspace body copy as it really hampers legibility. Use letterspacing when working with caps. small caps, numbers and display text where looser type spacing may increase legibility.
16. Word spacing should be fairly close
For text meant for extended reading, the amount of space between words in a paragraph should be fairly closeabout the width of a lowercase i. If the word spacing is too close, it appears as one giant word and legibility is decreased. Keep the spaces between words fairly thin, consistent and even!
17. Ideal column width
For single-column pages, 4.25 inches is ideal. For two-column width, columns can be as narrow as 2 inches. Turning on the hyphenation feature can improve word spacing.
18. Justification of text
Justification can be appropriate in certain places. However, it can create certain problems such as rivers and word spacing. Adjusting size of margins, decreasing body copy size, turning on auto hyphenation and manually hyphenating the text are all examples of possible solutions.
19. Choose the alignment that fits
Make sure the alignment chosen for all areas of text are legible and consistent with the design and guidelines. Left-aligned text is easier to read and set. Justified text is harder to set w/o inevitable word spacing problems. Right-aligned and centered are generally not used for body copy.
20. Rules of hyphenation
Dont rely on the software to judge where hyphens should be placed. At the end of lines, leave at least two characters behind and take at least three forward. For example, ele-gantly is acceptable, but elegant-ly is not because it takes too little of the word to the next line. Avoid leaving the stub end of a hyphenated word or any word shorter then four letters as the last line of a paragraph. Avoid more then 3 consecutive hyphenated lines. Avoid hyphenating or breaking proper names and titles. Creating a non-breaking space before and after the name will ensure that the name will not break.
21. Avoid beginning three consecutive lines with the same word
Since software programs deal with line breaks automatically based upon a number of variables, it is possible to have paragraphs with consecutive lines beginning with the same word. When this happens simply adjust the text to avoid/fix the problem.
22. Always spell check!
Once you are finished with your design, spell check the text using both of the following:
a. Use spell=check option that comes with the software you are using for the project.
b. Print the document and read it. The monitor and design of the document will make text look perfect when it may not be. Even if text is given to you by a client, check it. Never ever assume that
it is correct. Keep a dictionary close as well.
23. Avoid widows and orphans
Widows are either single words alone on a line or single sentences alone on a new page. Orphans are single lines of copy alone at the end of a page.
24. Kerning in headlines
Adjust the space between two particular letters to allow for more consistent negative space.
25. Indents
In continuous text, mark all paragraphs after the first with an indent of at least one em (3 spaces). Do NOT use three spaces but rather use the tabs or indents option in your software.
26. Items in a series
Items in a series do not use a comma before the word and. (i.e., peaches, apples and oranges.)
.................................................................................................................................................. X-HEIGHT (NEW TEXT)
Legibility is the concern of the typographer to select a typeface with appropriate clarity of design for the intended use at the intended size. The typeface chosen should be legible. That is, it should be read without effort. Sometimes legibility is simply a matter of type size; more often, however, it is a matter of typeface design. In general, typefaces that are true to the basic letterforms are more legible than typefaces that have been condensed, expanded, embellished, or abstracted.
Legibility is different from readability. Readability is the ease with which a reader can recognize words, sentences, and paragraphs. Legibility is a component readability. Other typographic factors that affect readability include font choice, point size, kerning, tracking, line length, leading, and justification. In typography, color can also describe the balance between black and white on the page of text. A typefaces color is determined by stroke width, x-height, character width and serif styles. As a designer, if you are only asked to make the text readable on the page the following questions should be asked Who is to read it?Someone that wants to read it? Someone that has to read it?
How will it be read?
Quickly. In passing. Focused. Near. Far.
........................................................................
Assignment
You will be exploring one type of typographic color.
To achieve results that can be compared you need to use the same sizes, same leading and the same column width. *there is an indesign document on the server for you to use, you may alter it as you wish. However all the content has to be on the page: 1) display the x-height 2) name the font, name the designer 3) paragraph of text; all paragraphs use the exact same size and leading 4) describe the color...
Choose any 12 serif fonts and 12 sans serif fonts from the approved font list. And compare the fonts based on the x-height.
Please make sure all the following information is on the page {do not crowd the pages.
-- x-height comparison
-- name of font
-- designers name
-- body copy all set to 8.5/12 It is critical that you see the same size fonts, leading and column width.
Only change the font in the example no other settings should change. notes: After you have made the comparison. Look carefully how the x-height, stroke weight and character width effect the color of the type. Also note how the visual size of the type faces that are the same size do not appear the same size. Is there a difference in readability? Describe the font its x-height, character width and color. copy and paste this copy to use in your assignment...
Futurism was first announced on February 20, 1909, when the Paris newspaper Le Figaro published a manifesto by the Italian poet and editor Filippo Tommaso Marinetti. The name Futurism, coined by Marinetti, reflected his emphasis on discarding what he conceived to be the static and irrelevant art of the past and celebrating change, originality, and innovation in culture and society. Futurism rejected traditions and glorified contemporary life, mainly by emphasizing two dominant themes, the machine and motion.
-- name of font
-- classification
-- designers name
-- notes (see above)
..................................................................................................................................................
GRID STRUCTURES
check out these references
AdamsMorioka Podcast 4 - Proportions in Design if you like the design duo: they have 7 videos on youtube all very good.
http://www.thegridsystem.org/
http://www.youtube.com/watch?v=MRUR52oTAP8
http://www.thinkingwithtype.com/contents/grid/ http://www.flickr.com/photos/31416613@N04/4115165043/
Text to include
Grid Structures When Designing a layout and working with text and/or images the use of a grid is essential, as it is the basis on which information is organized and clarified, ensuring legibility. The grid provides a framework were text, image and space can be combined into a cohesive manner.
A grid subdivides a page vertically and horizontally into margins, columns, inter-column spaces, lines of type, and spaces between blocks of type and images. These subdivisions form the basis of a modular and systematic approach to the layout, particularly for multi-page documents, making the design process quicker, and ensuring visual consistency between related pages.
At its most basic, the sizes of a grids component parts are determined by ease of reading and handling. From the sizes of type to the overall page or sheet size, decision-making is derived from physiology and the psychology of perception as much as by aesthetics. Type sizes are generally determined by hierarchycaptions smaller than body text and so oncolumn widths by optimum word counts of eight to ten words to the line, and overall layout by the need to group related items. This all sounds rather formulaic, and easy. But designers whose grids produce dynamic or very subtle results take these rules as a starting point only, developing flexible structures in which their sensibility can flourish.
Grids often need to be designed to give more flexibility than the single column of text per page (Jan Tschichold's grid). This is due to to a change in our reading patterns. Grid structures have to accommodate a greater variety of material such as photographs, illustrations, headings, captions, references, charts; they need to be more complicated than a grid using only text and may utilize more modules. The design of the grid had to be relevant to the purpose.
The grid system is an aid, not a guarantee. It permits a number of possible uses and each designer can look for a solution appropriate to his personal style. But one must learn how to use the grid; it is an art that requires practice. Josef Müller-Brockmann
(you may add any additional text you want from the pdf document)
Recreate these grids in your workbook (see links thegridsystem.org/, thinkingwithtype.com/contents/grid/
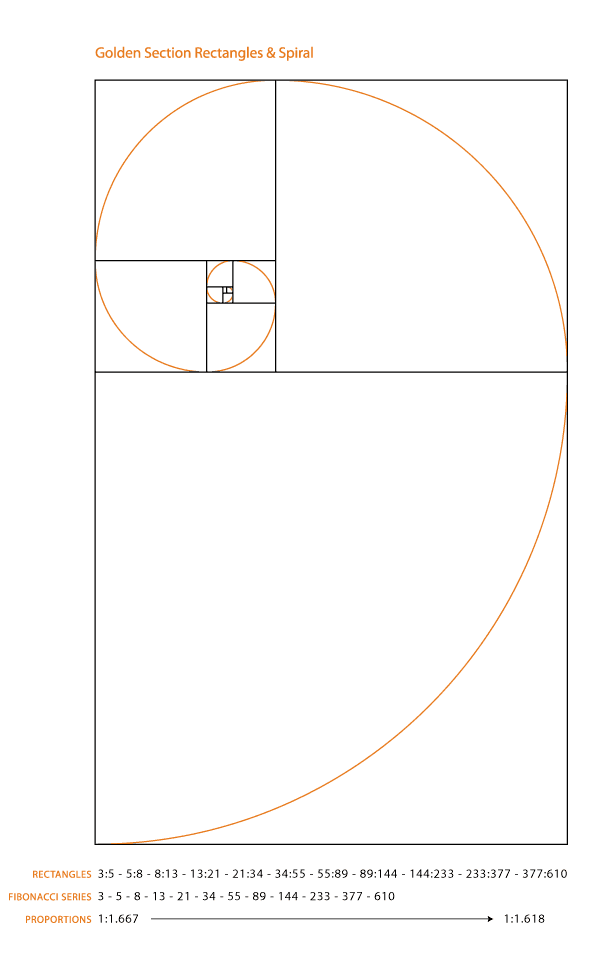
1) Tschichold's grid / symmetrical grid2) Define and illustrate: The Golden Section (Fibonacci's sequence)
3) Column grid
4) Modular grid
5) Asymmetrical grid
6) Baseline Grid Modular grids are created by positioning horizontal guidelines in relation to a baseline grid that governs the whole document. Baseline grids serve to anchor all (or nearly all) layout elements to a common rhythm. Create a baseline grid by choosing the type size and leading of your text, such as 10-pt Scala Pro with 12 pts leading (10/12). Avoid auto leading so that you can work with whole numbers that multiply and divide cleanly. Use this line space increment to set the baseline grid in your document preferences.
Adjust the top or bottom page margin to absorb any space left over by the baseline grid. Determine the number of horizontal page units in relation to the number of lines in your baseline grid. Count how many lines fit in a full column of text and then choose a number that divides evenly into the line count to create horizontal page divisions. A column with forty-two lines of text divides neatly into seven horizontal modules with six lines each. If your line count is not neatly divisible, adjust the top and/or bottom page margins to absorb the leftover lines. Illustrate a baseline grid
..................................................................................................................................................
QUOTES, APOSTROPHES
Use true quotation marks and apostrophes instead of using inch marks and feet marks. Place all punctuations inside the quotation marks.
Use real quotation marks never those grotesque generic marks that actually symbolize ditto/inch or foot marks: use "and" not and. Most software applications will convert the typewriter quotes to the real quotes for you automatically as you type. Check the preferences for your application youll find a check box to tell your application to automatically set something like typographers quotes, smart quotes, or curly quotes. Then as you type using the standard ditto key (), the software will set the correct quotation marks for you.
It is necessary to know how to set smart quotes/real quotes yourself because sometimes the software doesn't do it or does it wrong.
Quotes
Opening double quote: Type: Option [
Closing double quote: Type: Option Shift ]
Opening single quote: Type: Option [
Closing single quote: Type: Option Shift ]
(please include these and show them correctly)
Bridge Clearance: 16' 7"
The young man stood 6' 2"
The length of the wall is 153' 9".
Apostrophe
Apostrophe: option shift ]
As as aside, people often are confused about where the apostrophe belongs. There are a couple of rules that work very well.
For possessives: Turn the phrase around. The apostrophe will be placed after whatever word you end up with. For example, in the phrase the boys camp, to know where to place the apostrophe say to yourself, The camp belongs to the boys. The phrase the boys camp says The camp belongs to the boy.
The big exception to this is its. Its used as a possessive never has an apostrophe! The word it only has an apostrophe as a contraction its always means it is or it has. Always.
It may be easier to remember if you recall that yours, hers, and his dont use apostrophes and neither should its.
For contractions: The apostrophe replaces the missing letter. For example: yourre always means you are; the apostrophe is replacing the a from are. Thats an easy way to distinguish it from your as in your house and to make sure you dont say: Your going to the store.
As previously noted, its means it is; the apostrophe is indicating where the i is left out. Dont means do not; the apostrophe is indicating where the o is left out.
For omission of letters: In a phrase such as Rock n Roll, there should be an apostrophe before and after the n, because the a and the d are both left out. And dont turn the first apostrophe around just because it appears in front of the letter does not mean you need to use the opposite single quote. An apostrophe is still the appropriate mark (not n).
In a phrase such as House o Fashion, the apostrophe takes the place of the f. There is not earthly reason for an apostrophe to be set before the o.
In a phrase such as Gone Fishin the same pattern is followed the g is missing.
In a date when part of the year is left out, an apostrophe needs to indicate the missing year. In the 80s would mean the temperature; In the 80s would mean the decade. (Notice there is no apostrophe before the s! Why would there be? It is not possessive, nor is it a contraction it is simply plural.
..................................................................................................................................................
DASHES
Use proper em dashes, en dashes, and hyphens. Never use two hyphens instead of a dash.
Everyone knows what a hyphens is that tiny little dash that belongs in some words, like mother-in-law, or in phone numbers. Its also used to break a word at the end of a line, of course.
You might have been taught to use or given text that uses a double hyphen -- to indicate a dash. This is a typewriter convention because typewriters didnt have the real dash used in professional typesetting. On a Mac, no one needs to use the double hyphenwe have a professional em dash, the long one, such as you see in this sentence. We also have an en dash, which is a little shorter than the em dash.
hyphen -
en dash
em dash
An em is a unit of measure equal to the point size that you are using. An em dash is a type of punctuation used to offset clauses in a sentence or to indicate an abrupt change in thought. An en dash is equal to half the length of an em dash. En dashes are used to denote duration (time.)
Hyphen -
A hyphen is one third of the em rule and is used to link words. It serves as a compound modifier where two words become one, such as x-height. A hyphen is also used to break works at syllables in text blocks.
En dash
To type an en dash
en dash Option Hyphen hold the Option key down, then tap the hyphen key
An en dash is half of the em rule (the width of a capital N) and is used between words that indicate a duration, such as time or months or years. Use it where you might otherwise use the word to.
In a page layout application, the en dash can be used with a thin space on either side of it. If you want you can kern it so it is not a full space.
October December
6:30 8:45 A.M.
4 6 years of age
Em dash
To type an em dash
em dash Shift Option Hyphen Hold the Shift and Option keys down, then tap the hyphen key.
The em dash is twice as long as the en dashits about the size of a capital letter M in whatever size and typeface youre using at the moment. This dash is often used in place of a colon or parentheses, or it might indicate an abrupt change in thought, or its used in a spot where a period is too strong and a comma is too weak. It is also used for attribution of text. Mac is not a Typewriter
Our equivalent on the typewriter was the double hyphen, but now we have a real em dash. Using two hyphens(or worse, one) where there should be an em dash makes your look very unprofessional.
When using anno space is used on either side.
..................................................................................................................................................
SMALL CAPS (NEW TEXT)
Small caps are uppercase (capital) letters that are about the size of normal lowercase letters in any given typeface. Small caps are less intrusive when all uppercase appears within normal text or can be used for special emphasis. Computer programs can generate small caps for a any typeface, but those are not the same as true small caps. True small caps have line weights that are proportionally correct for the typeface, which me and that they can be used within a body of copy without looking noticeably wrong.
Use true small caps fonts. Avoid simply resizing capital letters or using the small caps feature in some programs. Instead use typefaces that have been specifically created as small caps.
When setting text that contains acronyms, select a typeface with small caps as a family. Selecting small caps from the style menus is a poor choice because the compute reduces the overall size of the type by 80%. This changes the stroke weight and the feel of the font. Expert sets in the Adobe Type Library have small caps options.
Assignment:
Identify and list 6 Serif fonts and 3 Sans Serif fonts that have small caps.
Create an example using fake small caps and an example with real small caps.
(example) There is No Rest for the Wicked. The Wicked are Very Weary.
(example) Harriet, an FBI agent, turned on CNN to get the dirt on teh CIA before going to bed at 9:30 P.M.
(include this text) Use small caps for acronyms. Set acronyms such as NASA or NASDAQ in small caps when they appear in body text or headlines. Use small caps for common abbreviations. Set common abbreviations such as AM or PM in small caps so they don't overpower the accompanying text. Use small caps for A.M. and P.M.; space once after the number, and use periods. (if the font does not have small caps reduce the font size slightly)
.................................................................................................................................................. NUMERALS/FIGURES (NEW TEXT)
In typography, the symbols used to represent numbers are commonly referred to as figures or numerals.Lining figures (also called aligning, cap, or modern figures) approximate capital letters in that they are uniform in height, and generally align with the baseline and the cap height. In some traditional typefaces, certain numerals extend slightly above and/or below the baseline and/or the cap height.
Oldstyle figures (also known as non-lining figures) do not line up on the baseline as regular or lining numerals do. Oldstyle figures can be found in various fonts. Oldstyle figures are a style of numeral which approximate lowercase letterforms by having an x-height and varying ascenders and descenders. They are considerably different from the more common lining (or aligning) figures. They have more of a traditional, classic look and are very useful and quite beautiful when set within text. However, they are only available for certain typefaces, sometimes as the regular numerals in a font, but more often within a supplementary or expert font. The figures are proportionately spaced, eliminating the white spaces that result from monospaced lining figures, especially around the numeral one.
Assignment:
Identify (list/show) 3 Serif and 3 Sans Serif fonts that have old style numbers.
Recreate the following example with find a font with aligning figures and a font that has aligning figures.
Align numbers using tabs with the align left tab arrow (will demonstrate in-class)
12
134
17
1023
323
Align numbers using tabs with the align to decimal point tab arrow (will demonstrate in-class)
12.5
134.76
17.8567
1023.4
323.12
If the body text has a significant amount of numbers, research a font family where they are included. If non-lining numerals are not available, use a slightly smaller point size for the lining numbers. Think of lining numbers as upper case numbers and non-lining numbers as lower case numbers.
Use aligning/oldstyle numbers in the following example:
Dear John, please call me at 438. 9762 at 3:00 to discuss marriage or write me at Route 916, zipcode 87505
Use aligning numbers in an example: Dear John, please call me at 438. 9762 at 3:00 to discuss marriage or write me at Route 916, zipcode 87505
Use old style/ non-aligning numbers in an example: Dear John, please call me at 438. 9762 at 3:00 to discuss marriage or write me at Route 916, zipcode 87505
..................................................................................................................................................
PARAGRAPH BREAKS
Paragraph breaks set a rhythm for the reader. The breaks have a relationship with the column of text as well as the page margins. A break may be introduced as an indentation, as a space or both. The over all page feel will be influenced by your choice.
In typography there are 4 rules regarding paragraph breaks:
1. first line at the beginning of an article should be flush left (do not indent first paragraph)
2. block paragraphs are flush left and are separated by extra leading not a full return 3. the amount indent is = to the leading (sometimes needs a bit more)
4. never hit two returns between paragraphs
Assignment:
explore at least 10 different ways to show that there are 3 paragraphs. The investigation should be of NEW and DIFFERENT ways to show a paragraph break. Begin with 8.5/12 as a baseline size and leading. You may make text smaller or larger to show a new paragraph. You are exploring only how to show a paragraph break NOT how to alter layouts. {There is a big difference}.
All solutions should be legible, clear and interesting.
Correct the text below before you begin; dashes, quotations marks, apostrophes, italic title of newspaper, superscript, accent marks: libertà. Mallarmé use this text for your assignment (first correct the text before duplicating it)
Futurism was first announced on February 20, 1909, when the Paris newspaper Le Figaro published a manifesto by the Italian poet and editor Filippo Tommaso Marinetti. The name Futurism, coined by Marinetti, reflected his emphasis on discarding what he conceived to be the static and irrelevant art of the past and celebrating change, originality, and innovation in culture and society.1 Futurism rejected traditions and glorified contemporary life, mainly by emphasizing two dominant themes, the machine and motion. The manifesto's rhetoric was passionately bombastic; its tone was aggressive and inflammatory and was purposely intended to inspire public anger and amazement, to arouse controversy, and to attract widespread attention.
But is is the movements which survive, oddly, here where we live and work as poets and artists: or, if not the movements, then their sense of art as an life itself. All of which, as futurism, had come sharply into focus by the start of the world war: a first radical mix of art and life, the epitome in the poplar mind of an avant-garde. It was, on both its Russian & Italian sides, the first great "art" movement led by poets; and if its means now sometimes seem exaggerated or unripe in retrospect, they carry within them the seed of all that we were later to become.
While Marinetti's opening manifesto for Italian Futurism bristled with a polemical stance in favor of the transformed present (1909), the later manifestos of Futurist poets and artists offered formal, "technical" approaches to the works then getting under way. The key term--still resonant today--was parole in liberta2, by which poetry was to become "an uninterrupted sequence of new images (a) strict bet of images or analogies, to be cast into the mysterious sea of phenomena." This freedom-of-the-world, while it resembled other forms of collage and of image juxtaposition, more fully explored the use of innovative and expressive typography in the visual presentation of language, as set in motion by forerunners like Mallarme. Outrageous and aggressive, the Futurists' performances mixed declamation and gesture, events and surroundings, indifference and engagement, to break the barriers between themselves and those who came to jeer or cheer them. Wrote Marinetti selbst3 (circa 1915), "Everything of any value is theatrical."
.................................................................................................................................................. HEADERS SUBHEADS CROSSHEADS
1. define header and subhead
2. explain any rules associated with header and subhead spacing assignment: using 6 solutions from your the paragraph break investigation add the header and subhead to the the text. Important questions to ask yourself: How are the headers/subheads treated? How to they relate to the text? How to the react to the page?
Please use all of the following text: the text is the same from the last exercise you are just adding a header and subheads. Look back at your font combinations to get an idea on typefaces you could use in combination.
Words in Liberty
A Prologue to Futurism
Futurism was first announced on February 20, 1909, when the Paris newspaper Le Figaro published a manifesto by the Italian poet and editor Filippo Tommaso Marinetti. The name Futurism, coined by Marinetti, reflected his emphasis on discarding what he conceived to be the static and irrelevant art of the past and celebrating change, originality, and innovation in culture and society.1 Futurism rejected traditions and glorified contemporary life, mainly by emphasizing two dominant themes, the machine and motion. The works were characterized by the depiction of several successive actions of a subject at the same time. Marinetti's manifesto glorified the new technology of the automobile and the beauty of its speed, power, and movement. He exalted violence and conflict and called for the sweeping repudiation of traditional cultural, social, and political values and the destruction of such cultural institutions as museums and libraries. The manifesto's rhetoric was passionately bombastic; its tone was aggressive and inflammatory and was purposely intended to inspire public anger and amazement, to arouse controversy, and to attract widespread attention.
Radical mix of art and life
But is is the movements which survive, oddly, here where we live and work as poets and artists: or, if not the movements, then their sense of art as an life itself. All of which, as futurism, had come sharply into focus by the start of the world war: a first radical mix of art and life, the epitome in the poplar mind of an avant-garde. It was, on both its Russian & Italian sides, the first great "art" movement led by poets; and if its means now sometimes seem exaggerated or unripe in retrospect, they carry within them the seed of all that we were later to become.
While Marinetti's opening manifesto for Italian Futurism bristled with a polemical stance in favor of the transformed present (1909), the later manifestos of Futurist poets & artists offered formal/"technical" approaches to the works then getting under way. The key term--still resonant today--was parole in liberta 2 , by which poetry was to become "an uninterrupted sequence of new images
(a) strict bet of images or analogies, to be cast into the mysterious sea of phenomena." This freedom-of-the-world, while it resembled other forms of collage and of image juxtaposition, more fully explored the use of innovative and expressive typography in the visual presentation of language, as set in motion by forerunners like Mallarme. But the verbal liberation didn't end with the page; it moved, rather, toward a new performance art and a poetry that "scurried off the page in all directions at once," as Emmett Williams phrased it for the "language happenings" of a later decade. Outrageous and aggressive, the Futurists' performances mixed declamation and gesture, events and surroundings, indifference and engagement, to break the barriers between themselves and those who came to jeer or cheer them. Wrote Marinetti selbst 3 (circa 1915): Everything of any value is theatrical."
..................................................................................................................................................
CAPTIONS AND NOTES
Footnotes and endnotes Footnotes and endnotes are necessary components of scholarly and technical writing. Theyre also frequently used by writers of fiction, from Herman Melville (Moby-Dick) to contemporary novelists. Whether their intent is academic or artistic, footnotes present special typographic challenges.
Specifically, a footnote is a text element at the bottom of a page of a book or manuscript that provides additional information about a point made in the main text. The footnote might provide deeper background, offer an alternate interpretation or provide a citation for the source of a quote, idea or statistic. Endnotes serve the same purpose but are grouped together at the end of a chapter, article or book, rather than at the bottom of each page.
These general guidelines will help you design footnotes and endnotes that are readable, legible and economical in space. (Note that academic presses and journals can be sticklers for format: before proceeding, check with your client or publisher to see if they have a specific stylesheet that must be followed.)
Numbers or Symbols: Footnotes are most often indicated by placing a superscript numeral immediately after the text to be referenced. The same superscript numeral then precedes the footnoted text at the bottom of the page. Numbering footnotes is essential when there are many of them, but if footnotes are few they can be marked with a dagger, asterisk, or other symbol instead. Endnotes should always use numerals to facilitate easy referencing.
Size: Footnotes and endnotes are set smaller than body text. The difference in size is usually about two points, but this can vary depending on the size, style and legibility of the main text. Even though theyre smaller, footnotes and endnotes should still remain at a readable size.
Assignment:
using 6 solutions from the header and subhead investigation use the footnotes, subscript numerals and superscript numerals correctly. Important questions to ask yourself: am I using the rule correctly, if am not why? How they are treated? How to they relate to the text? How to the react to the page?
add the footnotes (but don't use them at the foot of the page, how can they react or interact with the text on the page, think of them as "side notes)
1. Philip Meggs, History of Graphic Design, Van Nostrand Reinhold, 1988
2. parole in liberta = words set free (liberty)
3. selbst = himself *in your current project make sure you follow the rules you have learned about captions, notes, superscripts...
..................................................................................................................................................
Column Width
Having the right amount of characters on each line is key to the readability of your text. It shouldnt merely be your design that dictates the width of your text, it should also be a matter of legibility.
The optimal line length for your body text is considered to be 50-60 characters per line, including spaces. Reading takes place in small leaps of 510 characters at a time. 5560 characters per line could be considered an appropriate line length, allowing the eye 612 quick stops on each line. Narrower lines would cause the reader to have to switch from line to line unnecessarily often, and they also cause problems with the way justified columns appear.
If a line of text is too long the visitors eye will have a hard time focusing on the text. This is because the length makes it difficult to get an idea of where the line starts and ends. Furthermore it can be difficult to continue from the correct line in large blocks of text. If a line is too short the eye will have to travel back too often, breaking the readers rhythm. Too short lines also tend to stress people, making them begin on the next line before finishing the current one (hence skipping potentially important words).
Assignment 1:
Using the text below set the paragraph at 20 characters per line, 40 characters, 60 characters and 80 characters per line. Keep the font and the leading the same just change the column width
Futurism was first announced on February 20, 1909, when the Paris newspaper Le Figaro published a manifesto by the Italian poet and editor Filippo Tommaso Marinetti. The name Futurism, coined by Marinetti, reflected his emphasis on discarding what he conceived to be the static and irrelevant art of the past and celebrating change, originality, and innovation in culture and society. Futurism rejected traditions and glorified contemporary life, mainly by emphasizing two dominant themes, the machine and motion. The works were characterized by the depiction of several successive actions of a subject at the same time. Marinettis manifesto glorified the new technology of the automobile and the beauty of its speed, power, and movement. He exalted violence and conflict and called for the sweeping repudiation of traditional cultural, social, and political values and the destruction of such cultural institutions as museums and libraries. optonal
Assignment 2 (Using the text below illustrate what it is saying.)
Determining Line Length for Justified type
A general guideline for determining if your line length is long enough to satisfactorily justify the text: the line length in picas should be about twice the point size of the type; that is, if the type you are using is 12 point, the line length should be at least 24 picas (24 picas is 4 inches-simply divide the number of picas by 6, as there are 6 picas per inch). Thus 9-point type should be on an 18-pica line (3 inches) before you try to justify it, and 18-point type should be on a 36-pica line (6 inches). The rulers in most programs can be changed to picas, if you like.
..................................................................................................................................................
Leading
Line spacing is the vertical distance between lines of text. Leading is the hot-metal printing term that refers to the strips of lead that were inserted between text measures in order to space them accurately. Leading is specified in points and refers now days to the space between lines of a text block. Leading introduces space into the text block and allows characters to "breathe" so that the information is easy to read.
To achieve a balanced and and well-spaced text block, leading usualy has a higher point size than the text it is associated with, for example 9pt text maybe set with 12pt leading.
Most writers use either double-spaced lines or single-spaced linesnothing in betweenbecause those are the options presented by word processors. These habits are held over from the typewriter era. Originally, a typewriters carriage could only move vertically in units of a single line. Therefore, linespacing choices were limited to one, two, or more lines at a time. Double spacing became the default because single-spaced typewritten text is dense and hard to read. But double-spacing is still looser than optimal.
Assignment
Using 3 different column widths set the leading to negative, set solid, normal, extreme
-- negative leading is when the leading is smaller than the type size 9pt/7pt
-- set solid means the leading and the type size are the same size 9pt/9pt
-- normal would be something like 8.5pt/12pt
-- then you get extreme...
..................................................................................................................................................
Kerning
Kerning is an adjustment of the space between two letters. The characters of the Latin alphabet emerged over time; they were never designed with mechanical or automated spacing in mind. Thus some letter combinations look awkward without special spacing considerations. Gaps occur, for example, around letters whose forms angle outward or frame an open space (W, Y, V, T). In metal type, a kerned letter extends past the lead slug that supports it, allowing two letters to fit more closely together. In digital fonts, the space between letter pairs is controlled by a kerning table created by the type designer, which specifies spaces between problematic letter combinations. Working in a page layout program, a designer can choose to use metric kerning or optical kerning as well as adjusting the space between letters manually where desired. A well-designed typeface requires little or no additional kerning, especially at text sizes.
metric kerning
uses the kerning tables that are built into the typeface. When you select metric kerning in your page layout program, you are using the spacing that was intended by the type designer. Metric kerning usually looks good, especially at small sizes. Cheap novelty fonts often have little or no built-in kerning and will need to be optically kerned.
optical kerning
is executed automatically by the page layout program. Rather than using the pairs addressed in the font's kerning table, optical kerning assesses the shapes of all characters and adjusts the spacing wherever needed. Some graphic designers apply optical kerning to headlines and metric kerning to text. You can make this process efficient and consistent by setting kerning as part of your character styles.
..................................................................................................................................................
ALIGNMENTS
In unjustified text, the text block is set with normal letter and word spacing. Because of the even word spacing the text will have an even texture no large spaces between words. The lines will naturally vary in length. a ragged text block can integrate with the layout and add visual interest to the page. The difficulty is making the ragged edge have a pleasing silhouette. When the first line in the text is longer than the second, it becomes separate from the layout and creates a box-like shape. This destroys one of the advantages of unjustified text. The ragged edge needs to have a life, but a narrow column can be less active. Another advantage to ragged text is less hyphenation is needed. Therefore, names, dates or words which are normally read together can stay together.
If someone insists that fully justified text is better than left-aligned text, tell them they are wrong. If someone else tells you that left-aligned text is better than justified text, tell them they are wrong.
If they are both wrong, then what's right? Alignment is only a small piece of the puzzle. What works for one design might be totally inappropriate for another layout. As with all layouts, it depends on the purpose of the piece, the audience and its expectations, the fonts, the margins and white space, and other elements on the page. The most appropriate choice is the alignment that works for that particular design.
Left Aligned, Ragged Right
Speaking just in terms of alignment, left aligned (Flush Left, Ragged Right) text is the most readable. Left aligned text uses the optimum word spacing and letter spacing that the designer built into the font, and the spacing is very consistent so you do not have to struggle through the words at all. And as you read, your key can quickly find the beginning of the next line.
Often considered more informal, friendlier than justified text. The ragged right edge adds an element of white space. May require extra attention to hyphenation to keep right margin from being too ragged. Generally type set left-aligned is easier to work with (i.e. requires less time, attention, and tweaking from the designer to make it look good).
If you bump (soft return) words down, be sure to do it as the last south in your final layout. Otherwise when you edit the text, change the type size or column width, alter the layout in any way, you will ed up with tab spaces, empty spaces or line breaks in the middle of your sentences. Fortunately, in flush left alignments you can easily make type corrections and adjust lines, often without effecting the rest of the text.
Because you can control where lines end you can try to avoid beginning consecutive lines with the same word. Avoid ending consecutive lines with the same word. And avoid ending lines with the words: the, of, at, a, by...
Center Aligned
There is nothing inherently wrong with centered text. As with ragged right or fully-justified text alignment, what works for one design might be totally inappropriate for another layout. There are simply fewer situations where centered text is appropriate. When in doubt, don't center it.
As with all layouts, alignment depends on the purpose of the piece, the audience and its expectations, the fonts, the margins and white space, and other elements on the page. The most appropriate choice is the alignment that works for that particular design.
No matter what alignment you use, remember to pay close attention to hyphenation and word/character spacing as well to insure that your text is as readable as possible.
There will undoubtedly be well-meaning friends, business associates, clients, and others who will question your choices. Be prepared to explain why you chose the alignment you did and be prepared to change it (and make necessary adjustments to keep it looking good) if the person with final approval still insists on something different.
Justified
Text When you justify text, the computer forces the lines to extend to a certain length by adding or deleting space between the words, and sometimes between the letters. Some programs let you specify the minimum and maximum amounts the spacing can adjust, but the computer will override your specifications if necessary.
The greatest problem with justified text, both in terms of readability and aesthetics, is the uneven word spacing and letter spacing: some lines have extra spacing, some less. This irregularity is visually disturbing and interrupts reading. The shorter the line length in relation to the size of the type, the worse this problem becomes because there are fewer words between which to add or delete space. * Please make an example of this in your workbook)
One simple rule for determining whiter a line length is "long enough" to justify is this: The line length in picas should be twice the point size of the type. If you are using 12 point type, the minimum line length you should try to justify is 24 picas (6 picas = 1 inch).
For many years, justified type reigned supreme as the way to set most text. But the trend over the past couple of decades has been to allow the natural spacing of flush left text to dominate, losing the structured look of the "block" of text and maximizing readability.
..................................................................................................................................................
JUSTIFICATION
Justify text only if the line is long enough to prevent awkward and inconsistent word spacing. The only time you can safely justify text is if your type is small enough and your line is long enough, as in books where the text goes all the way across the page. If your line is shorter, as in newsletter, or if you don't have many words on the line, than as the type aligns to the margins the words space themselves to accommodate it. It usually looks awkward. You've seen newspaper columns where all text is justified, often with a word stretching all the way across the column, or a little word on either side of the column with a big gap in the middle. Gross. But that's what can happen with justified type. When you do it, the effect might not be as radical as the newspaper column, but if your lines are relatively short, you will inevitably end up with uncomfortable gaps in some lines, while other lines will be all squished together. When your work comes out of the printer, turn it upside down and squint at it. The rivers will be very easy to spot. Get rid of them. Try squinting at the example on the bottom of the previous page.
Reminder:
A general guideline for determining if your line length is long enough to satisfactorily justify the text: the line length in picas should be about twice the point size of the type; that is, if the type you are using is 12 point, the line length should be at least 24 picas (24 picas is 4 inches-simply divide the number of picas by 6, as there are 6 picas per inch). Thus 9-point type should be on an 18-pica line (3 inches) before you try to justify it, and 18-point type should be on a 36-pica line (6 inches). The rulers in most programs can be changed to picas, if you like.
Rivers
In typography, rivers, or rivers of white, are visually unattractive gaps appearing to run down a paragraph of text. They can occur with any spacing, though they are most noticeable with wide word spaces caused by either full text justification or monospaced fonts.
Widows and Orphans
Never leave widows and orphans bereft on the page. Avoid both of these situations. If you have editing privileges, rewrite the copy, or at least add or delete a word or two. Sometimes you can remove spacing from the letters, words, or lines, depending on which program youre working in. Sometimes widening a margin just a hair will do it. But it must be done. Widows and orphans on a page are wrong.
Widow
When a paragraph ends and leaves fewer than seven characters (not words, characters) on the last line, that line is called a widow. Worse than leaving one word at the end of a line is leaving part of a word, the other part being paraphrased on the line above.
Orphan
When the last line of a paragraph, be it ever so long, wont fit at the bottom of a column and must end itself at the top of the next column, that is an orphan. ALWAYS correct this.
Assignment:
use one size, one leading, one column width. JUSTIFIY the text. All you are changing is the Justification setting in InDesign. The goal is to find a setting that has a comfortable wordspace and letterspace.
Try 5 different settings using one SERIF font, try the same settings with a SANS SERIF (10 total)
a. change the min, desired, maximum numbers
b. write down the numbers for each setting write down what the problems are ie. too large wordspacing, too tight...
..................................................................................................................................................
HYPHENATION RULES
Dont rely on the software to judge where hyphens should be placed. At the end of lines, leave at least two characters behind and take at least three forward. For example, ele-gantly is acceptable, but elegant-ly is not because it takes too little of the word to the next line. Avoid leaving the stub end of a hyphenated word or any word shorter then four letters as the last line of a paragraph. Avoid more then 3 consecutive hyphenated lines. Avoid hyphenating or breaking proper names and titles. Creating a non-breaking space before and after the name will ensure that the name will not break. Avoid beginning three consecutive lines with the same word Since software programs deal with line breaks automatically based upon a number of variables, it is possible to have paragraphs with consecutive lines beginning with the same word. When this happens simply adjust the text to avoid/fix the problem. Hyphenation rules pay attention to:
-- how the text is read avoid widows (one word on the last line of a paragraph)
-- avoid hyphenating or line brakes of names and proper nouns
-- leave a least 2 characters on the line and 3 following
-- avoid beginning consecutive lines with the same word
-- avoid ending consecutive lines with the same word
-- avoid ending lines with the words: the, of, at, a, by...
-- never hyphenate a words in a headline and avoid hyphenation in a callout
..................................................................................................................................................
COMBINING TYPEFACES (we will do this in class)
When combining serif and sans serif text fonts, one shroud try and match the characteristics of form and type color: proportion, x-heights.
There is not binding recipe for type combinations. It is a matter of typographic sensitivity and experience. Expert typographers, as well as careless amateurs permit themselves combinations that would horrify colleagues with more traditional sympathies.
Although there is not recipe there is a place to start: keep an eye on the characteristic shapes of the letterform. A well designed page contains no more than two different typefaces or four different type variations such as type size and bold or italic style. {Using 2 different serif fonts or 2 different sans serifs fonts in the same composition is never a good idea}
Assignment
Try the 10 type combinations
Combine serif with sans serif
Write down the font in the combination. Why you think that particular font works well with the other and any changes you made to make the fonts combine well.
.................................................................................................................................................. LULU INSTRUCTIONS
1) In your workbook you will need to have your title page on the SINGLE first page of the InDesign document. If you don't your entire book will be 1 page off. Meaning spreads will not be spreads.
2) Have a second InDesign document with your COVER. Front Spine Back. LULU will TELL YOU THE SIZE when you are uploading your file. So wait to design the cover until you have uploaded your book to lulu.
3) Once you are ready to upload. you have proofed your book a couple of times. you have extended your bleads out .25 then you are ready. EXPORT your FILE as a PDF in SINGLE PAGES. Do not export as spreads. MUST be SINGLE PAGES.
4) http://www.lulu.com/publish/books/ Create an account Bleed info (will need to be signed in)
5) Browse for your pdf (single page) and click Upload
6) Depending on your connection it could take several minutes
7) Once is it uploaded you cansee you have options including DELETE. Click MAKE PRINT READY FILE.
8) Save and continue. Go to the Advanced Cover it will TELL you the exact size of your cover including the spine. Make the Cover in InDesign. Follow the sizes lulu give you.
9) Go through the rest of the steps. Do not make your book public. Do not sell it on the market place.
10) Just because you uploaded your book does not mean you have purchased it. THAT is the last step you have to purchase the book.
..................................................................................................................................................
REFINE BOOK AND ADD cover, title page, table of contents... save as pdf and put it on the server so i can look at it BEFORE you send it off to lulu.
.................................................................................................................................................. DUE:
LULU info and tips http://www.lulu.com
TEST: you can upload to LULU and not purchase it. I suggest uploading a TEST version before you try to upload youf final book. This will also allow you to get the cover size information.
Only upload files for the inside of your book right now. We'll take care of your cover files later.
Got more work to do? No problem. We've saved your progress so far. You can get back to this step any time from your Project List in My Lulu.
Page 1 is YOUR TITLE PAGE the inside first page of your book. Do not LEAVE it blank
MAKE SURE ALL YOUR FONTS are turned on do not export to pdf if you have any font errors -- lulu gets mad
Export pdf as PAGES not SPREADS!
Upload and continue and save
COVER you can use the LULU cover maker but most of you will want to click on ONE-COVER WIZARD it wil tell you exactly want size to make you cover * you can do all this and not SEND to lulu. Just try it.
It gave me this info (your MAYBE DIFFERENT depends completely on HOW MANY PAGES are in your book)
One-piece cover requirements:
Your file must be a PDF, JPG, GIF, or PNG
Spine width: 46 Postscript points wide (0.639") (192 px)
Spine begins 657 Postscript points (9.13") (2738 px) from the left.
Total cover width: 1360 X 900 Postscript points (18.89" X 12.50") (5667px X 3750px)
If using an image, its resolution should be set to 300dpi
YOU HAVE TO click PURCHASE A COPY to actually purchase it. Just because you upload it does not mean it is being shipped to you.
please read a GREAT HOW TO PDF by LULU http://www.lulu.com/author/samples/Lulu_Publishing_How_To.pdf
pdf troubleshooting:
Formatting a pdf and making bleeds